- Download and install the software.
- It will scan your computer for problems.
- The tool will then fix the issues that were found.
If you get a persistent “Windows failed to complete installation” error message and have to reboot your system several times, you’re probably trying to install the Windows 7/Windows 10 x64 operating system, or maybe you’re reinstalling Windows interrupted before creating a user account. But don’t worry, you’re definitely not alone. On this page, we present three simple solutions, all of which have been tested by real users and gave good results.
If you encounter this problem, you will get the following full error message;
Windows was unable to complete the installation. To install Windows on this computer, restart the installation.
Table of Contents:
What causes the “Windows failed to complete installation” problem?

After reviewing some users’ experiences and learning some troubleshooting techniques, we have come to the conclusion that the main causes of this error message are the following.
- Damaged system files: The main reason for this problem is usually the fact that some update files may be corrupted in your system, so when you try to install on your computer, you get a Windows failed installation message. Therefore, it is recommended that you perform a system restore and then check if this solves the problem.
- Incorrect password setting: it is possible that your computer’s password policy is causing an error by imposing a password at a certain stage. Therefore, it is important to change this policy in the Local Security Policy window, and then check to see if this resolves the update error message.
- Registry key configuration: some users get the error message “Windows installation failed” because some registry keys on their computer are not properly configured and prevent them from installing the update on their computer. Therefore, as described below, you can change these registry keys and make sure they are configured correctly so that Windows can be installed.
- Validation Mode: If the computer is in validation mode, a “Windows failed to complete installation” error occurs. Therefore, we recommend that you take the system out of test mode and then see if the error message can be resolved.
- Administrator account: Sometimes the administrator account is disabled on the computer during the update implementation, which may cause the “Windows failed to complete installation” error when applying the update. Therefore, we recommend that you activate the administrator account and then see if you can resolve the issue.
How to resolve the “Windows failed to complete installation” error
Perform an automatic repair
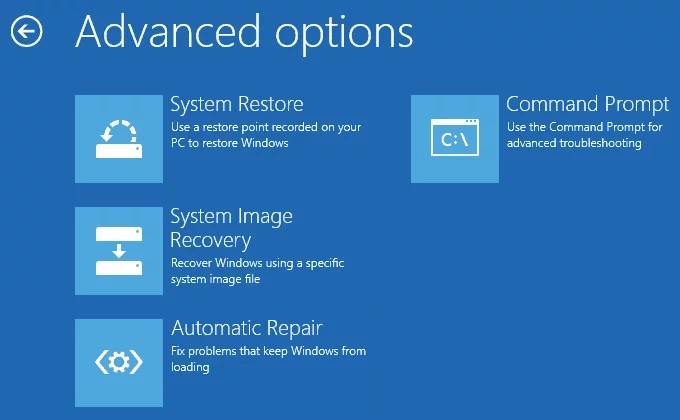
Windows 10 includes a built-in tool to help you fix problems with your PC. Here’s how to run the Automatic Repair tool:
- Go to Start > Settings > Update & Security.
- Under “Update & Security,” select “Troubleshoot.”
- Select “Advanced options.”
- Select “Automatic Repair.”
- Follow the prompts to begin the repair process.
The Automatic Repair tool will scan your PC for common problems and attempt to fix them automatically. If it is unable to fix the problem, it will give you some options for troubleshooting that you can try yourself.
Updated: July 2025
This tool is highly recommended to help you fix your error. Plus, this tool offers protection against file loss, malware, and hardware failures, and optimizes your device for maximum performance. If you already have a problem with your computer, this software can help you fix it and prevent other problems from recurring:
- Step 1 : Install the PC Repair and Optimizer Tool. (Windows 10, 8, 7, XP, Vista).
- Step 2 : Click Start Scan to determine what problems you are experiencing with your computer.
- Step 3 : Click Repair Allto resolve all problems.

Activate the administrator account
In order to enable the Administrator account on Windows 10, you’ll need to first open the Start Menu and search for “cmd.” Right-click on the Command Prompt app and select “Run as administrator.”
In the command prompt window that appears, type “net user administrator /active:yes” and press enter. You should see a message that says, “The command completed successfully.” You can now close the command prompt window.
The next time you restart your computer, you’ll see the Administrator account listed as an option when you sign in. Keep in mind that this account has full administrative privileges, so use it with caution.
Restore the system
Windows 10 offers a built-in tool to create a system restore points and restore your computer to a previous state. If you’re experiencing problems with your PC, you can use this tool to get it back to a working condition. Here’s how to do it:
- First, open the Start menu and type ‘Create a restore point’. This will bring up the System Properties dialog box.
- Next, click on the ‘System Restore’ button. This will launch the System Restore wizard.
- On the next page, select ‘Choose a different restore point’.
- Now, select the most recent restore point from the list and click ‘Next’.
- Finally, click ‘Finish’ to begin the restoration process. Keep in mind that this will revert your computer to the selected restore point, so any changes made since then will be lost.
Run the installation in clean boot mode
Running the installation in clean boot mode is a great way to ensure that your system is not constricted by unnecessary programs and processes. This mode essentially runs your system with only the bare minimum of programs and processes, which can help to speed up the installation process. In order to run the installation in clean boot mode, you will need to follow these steps:
- Open the Start menu and type “msconfig” into the search bar.
- Select the “Boot” tab and then check the box next to “Safe Boot”.
- Click “Apply” and then “OK”.
- Restart your computer and then begin the installation process.
- Once the installation is complete, open the Start menu and type “msconfig” into the search bar once again.
- Select the “Boot” tab and then uncheck the box next to “Safe Boot”.
- Click “Apply” and then “OK”.
- Restart your computer and you should be all set!
APPROVED: To fix Windows errors, click here.
Frequently Asked Questions
How do you fix Windows could not complete the installation?
- Continue the installation with Advanced Restore.
- Run the Windows account wizard.
- Reinstall the system without activating it.
- Find another source for the installation media.
Why does Windows 10 installation keep failing?
A possible reason for the "Windows 10 installation failed" error message is that an important system dependency, process or service is corrupted and cannot be replaced by a new one during the upgrade process.
Why is Windows failing to install?
The "Windows installation failed" error message may be caused by installed components that need to be uninstalled before the upgrade. Some programs, such as your antivirus program, may prevent Windows installation from working correctly. In some cases, a clean reinstallation is the only way to permanently resolve the problem.