- Download and install the software.
- It will scan your computer for problems.
- The tool will then fix the issues that were found.

The “System error 67 has occurred” problem occurs when Windows users try to run a network discovery scan or when they try to map a network drive from CMD or Powershell.
It turns out that one of the most common causes of this error is incorrect syntax. Some users use backslashes instead of forward slashes, forcing the terminal to treat them as offering options.
However, a faulty driver can also cause this error. Especially if you are using an older version of the driver that was released immediately after the first start of Windows 10. Other possible reasons are enabled policy for secure UNC paths or incorrectly configured IP NAT.
Table of Contents:
Check the command syntax
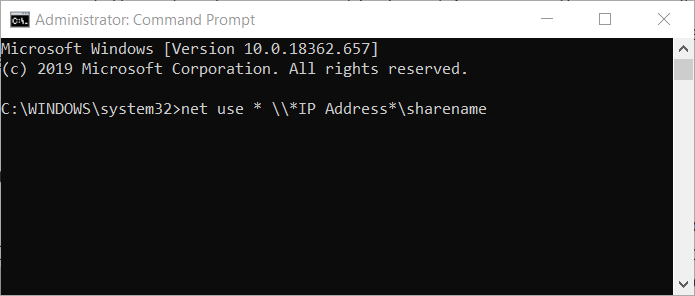
System error 67 can often be caused by a syntax error in the net map command. So make sure you enter the net map command correctly.
Make sure you enter the forward slash for the command on the right. The basic syntax for the net map command is net use * * IP address * sharename.
This way, there should be no left and right forward slashes around the command IP.
Disable network address translator
- Microsoft’s official solution for System Error 67 is to disable the network address translator. Therefore, right-click the Start button and select Device Manager to open the window below.
- Click the View menu.
- Select the Show hidden devices option.
- In Device Manager, double-click the Non-Plug and Play Drivers category.
- Right-click the IP Address Translator to select Disable.
Updated: July 2025
This tool is highly recommended to help you fix your error. Plus, this tool offers protection against file loss, malware, and hardware failures, and optimizes your device for maximum performance. If you already have a problem with your computer, this software can help you fix it and prevent other problems from recurring:
- Step 1 : Install the PC Repair and Optimizer Tool. (Windows 10, 8, 7, XP, Vista).
- Step 2 : Click Start Scan to determine what problems you are experiencing with your computer.
- Step 3 : Click Repair Allto resolve all problems.

Enable the UNC hardened path policy in the Group Policy Editor
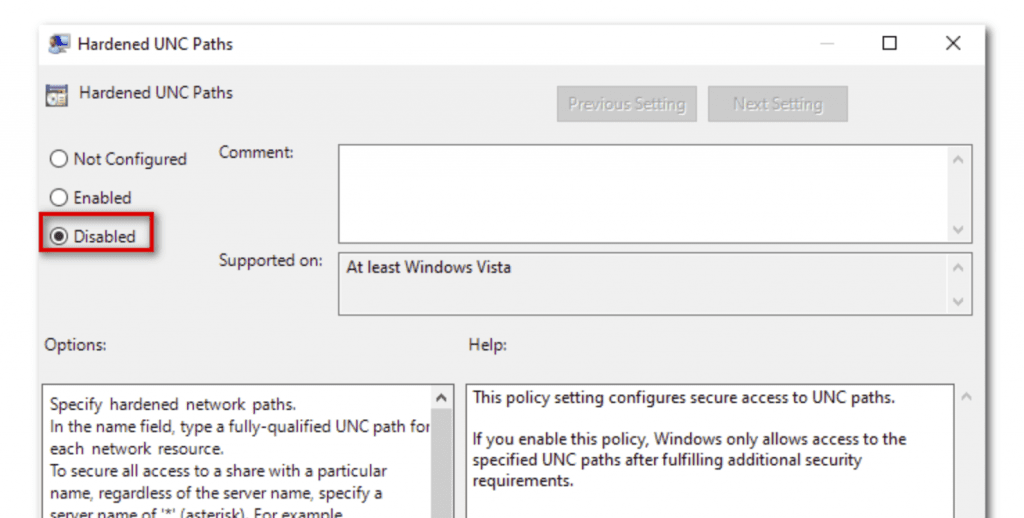
Step 1. Press Windows Key + R to open the Run dialog box.
Step 2: Type gpedit.msc and press Enter to open the Local Group Policy Editor. Click when you are prompted to enter User Account Control (UAC).
Step 3. Navigate to the following location: Computer Configuration> Administrative Templates> Network> Network Provider.
Step 4: Expand the Network Providers folder. In the right pane, double-click the Hardened Paths UNC policy setting.
Step 5: Change the state to Disabled and click Apply to save the changes.
Step 6: restart your computer.
Update the network driver to the latest version
Step 1. Press Windows Key + R to open the Run dialog box.
Step 2: Type devmgmt.msc and press Enter to open the device manager. Click Yes when prompted for User Account Control (UAC).
Step 3: Scroll down the list of installed devices and find the Network adapters section.
Step 4. Expand the “Network adapters” drop-down menu, right-click on the network driver and select “Properties” from the context menu.
Step 5: Select the “Driver” tab and click the “Update Driver” button.
Step 6: Click on the “Search automatically for updated driver software” hyperlink.
Step 7. Follow the instructions on the screen to install the latest network driver.
Step 8: restart your computer.
APPROVED: To fix Windows errors, click here.