Updated July 2025: Stop these error messages and fix common problems with this tool. Get it now at this link
When we surf the Internet and explore websites, we often encounter a problem connecting to the Internet, and when we try to find the cause, we get a warning that the “default gateway not available“. Now let us know what it means and how we can fix it in Windows 10.
Table of Contents:
What is the default gateway?
The default gateway is a router or network node in a computer network system that acts as a transmission leap to another network system if the routing table does not specify the IP address for the next-hop to transmit a packet to the target node.
Thus, the default gateway serves as an access point to other networks when one network wants to communicate or send data packets to another network. This includes changing the IP address and subnet mask of the system and network topology.
In general, each of the components on each network supports a routing table that specifies the port or interfaces to be used for communication, the rules to follow, and the route by which specific data packets will be delivered over the network.
If an IP packet, in any host instance, does not find a suitable set of rules and routes to deliver the packet to its destination address, it selects the default gateway for the rest of the routing process.
Therefore the default gateway is defined by a set of specific configurations known as the default route. In small offices or home networks, the router connecting the local network to the Internet acts as the default gateway for all network components.
Reasons for the “default gateway not available” error
You may have a connection problem with limited Wi-Fi access. When troubleshooting the network the error “The default gateway not available” is displayed and the problem is not solved. You will see a yellow exclamation mark on the Wi-Fi icon in the system tray and you will not be able to access the Internet until the problem is solved.

The main reason for this error seems to be damaged or incompatible network adapter drivers. Outdated router settings and drivers may also cause this problem. Some users have reported that McAffee security solutions can sometimes block your connection. In some cases, this error can also be caused by malware or viruses, so we need to solve the problem completely. So, without wasting time, let us see how to actually fix the “default gateway not available” in Windows 10, using the solutions below.
Solutions for the default gateway unavailable error
Updated: July 2025
This tool is highly recommended to help you fix your error. Plus, this tool offers protection against file loss, malware, and hardware failures, and optimizes your device for maximum performance. If you already have a problem with your computer, this software can help you fix it and prevent other problems from recurring:
- Step 1 : Install the PC Repair and Optimizer Tool. (Windows 10, 8, 7, XP, Vista).
- Step 2 : Click Start Scan to determine what problems you are experiencing with your computer.
- Step 3 : Click Repair Allto resolve all problems.
Solution 1: Temporarily disable the antivirus software
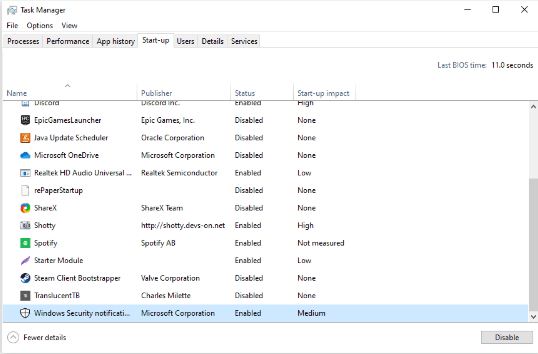
It is known that antivirus applications cause problems with the network and Internet connections of Windows 10. You can easily check if your antivirus software interferes with your connections by temporarily disconnecting it.
If you can connect to the Internet without getting the “default gateway not available” error after disconnecting these applications, it is very likely that they cause the error.
Here is how to temporarily disable any antivirus applications.
Note: Be sure to enable Windows Defender when using a system without a third-party antivirus program. This is an easy-to-use security solution built into Windows 10, which provides basic protection against most threats.
- Right-click the blank area in the taskbar and select Task Manager.
- If the Task Manager is running in compact mode, be sure to expand the details by clicking on the Mode Details button.
- Use the title menu at the top of the window to go to the Start tab.
- Find your antivirus application in the list and select it by clicking once.
- Click the “Disable” button, which is now in the lower right corner of the window. This will disable the application when you start the device.
- Reboot your computer and try to connect to the network again.
Solution 2: Remove McAfee from the computer
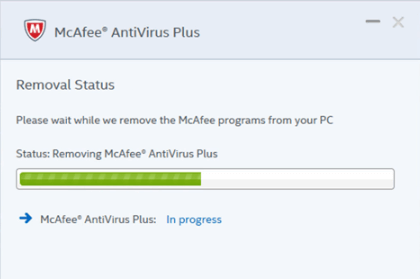
Many users reported that removing McAfee applications from their devices helped correct the error “The default gateway not available”. If you are using such applications, we recommend that you remove them temporarily and check if they interrupt your network connection.
If you find that your McAfee product has caused network errors in Windows 10, we recommend that you contact customer support. You can contact them by clicking on this link and looking at the options available.
- Open the Start menu by clicking on the Windows icon at the bottom left of the screen. You can also press this key on your keyboard to open the menu.
- Click Settings on the left side of the context menu. It is marked with a pinion icon. For quicker access, simply use the Windows + S shortcut keys.
- You will then see a new window with many system options. Click on Apps.
- Stay on the default page and wait for the applications to load. This may take some time, depending on the number of applications installed on your device.
- Use the search function to find “McAfee”.
- Select the McAfee product, then select the “Delete” option.
- Follow the on-screen instructions to remove your McAfee product from your device. If there are other McAfee requests in the list, repeat these steps to remove them.
- Reboot your computer after the uninstallation is complete. You should be able to test your Internet connection immediately.
Note: If McAfee was pre-installed on your system, you may still have a few files left after uninstalling the application. Find these files and uninstall them manually. This may solve your problems.
Solution 3: Disabling the autorun function
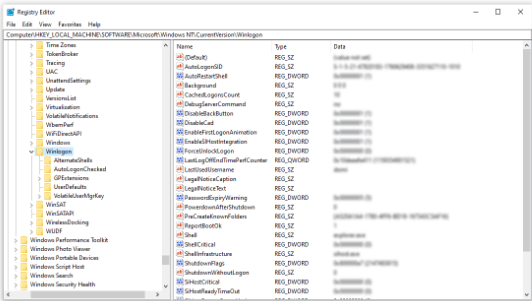
Although Autorun changed the game in Windows 8, it can cause network conflicts on newer systems. Fortunately, you can use the Registry Editor, which comes with all copies of Windows, to disable this feature and check to see if you are logged back in or not.
Attention: Before you start working with this tutorial, we recommend that you create a backup copy of the registry. If you do not know how to create and import registry backups, see “Backing up, restoring, importing and exporting the registry” in Windows Ninja.
- Press the Windows + R keys on your on-screen keyboard to open “Run”, then type “regedit” in the edit box. Press the OK key to launch the registry editor.
- You can navigate through the Registry Editor by expanding the folders with an arrow next to their names. Use it to find the following registry key: HKEY_LOCAL_MACHINE\SOFTWARE\Microsoft\Windows NT\Current Version\Winlogon.
You can also copy and paste the key to the address bar of the registry editor to speed up navigation.
- Right-click on AutoAdminLogon and select Edit from the context menu.
- Change the data value from “1” to “0” and click “OK”. Make sure not to change any other settings!
- Close the registry editor and reboot your computer.
Solution 4: Reset TCP/IP by Netsh command
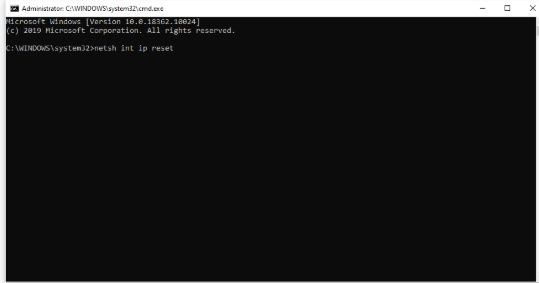
The command line can be used to reset TCP/IP settings and possibly to solve problems with the default gateway. Just follow the steps below to learn how to do it.
- Press the Windows + R keys on the on-screen keyboard. This launches the Run utility.
- Type “cmd” and press Ctrl + Shift + Enter on the keyboard. This will launch a command line with administrator rights.
- When prompted, press “Yes” to allow the command line to make changes to your device.
- While at the command line, type the following command and press Enter to start it: netsh int ip reset
- Wait until the order is finished processing. Do not close the command line or shut down the computer.
- Reboot the device after completing the command and reset the TCP/IP settings.
Solution 5: Update your network adapter drivers
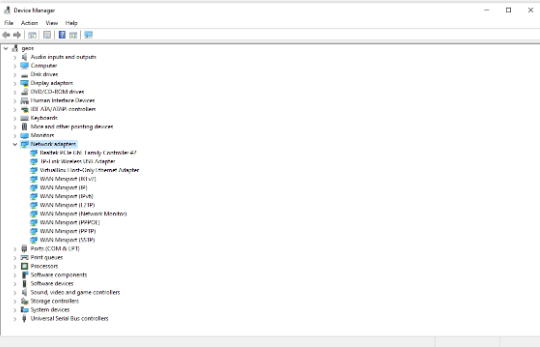
It is very important for drivers to be aware of the latest versions. When errors are reported to the manufacturer, the manufacturer may introduce new fixes that may fix the “default gateway not available” error in Windows 10.
Here is how you can update drivers for your network adapter in just a few minutes. This process is automatic, which means you can do it easily.
- Click on the “Search” icon in the taskbar next to the Windows icon. The function is displayed using a magnifier. You can also open it using the Windows + S keyboard combination.
- Enter “Device Manager” and click on the corresponding result to launch it in a new window.
- Click on the arrow next to “Network adapter” to enlarge it.
- Right-click on the adapter and select “Update Driver”.
- Select “Automatically check driver software update” and follow the on-screen instructions to update drivers.
- After a successful update, restart your computer and check for problems with the default gateway.
Solution 6: Change the power management settings of the network adapter
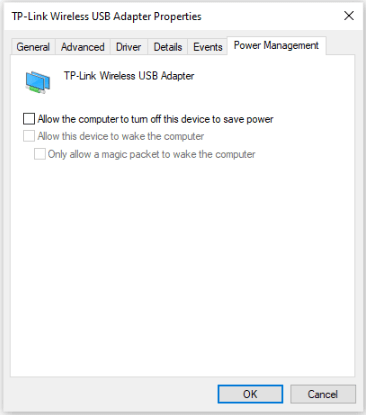
Some users have noticed that a certain power management parameter may cause problems with the Internet connection. This is because your system temporarily shuts down the network adapter, which causes a connection loss and displays the error “Default gateway unavailable”.
- Click the “Search” icon on the taskbar next to the Windows icon. The function is displayed using a magnifier. You can also open it using the Windows + S keyboard combination.
- Enter “Device Manager” and click on the corresponding result to launch it in a new window.
- Click on the arrow next to “Network adapter” to enlarge it.
- Right-click on the adapter and select “Properties”.
- Click on the “Power Management” tab using the title menu at the top of the window.
- Make sure the “Allow computer to shut down this device to save power” option is not checked. If it is, simply uncheck the checkbox by clicking on it.
- Click the OK button to finish making the changes. You can try to use your Internet connection and see if the error will return.
Conclusion
Most of our work depends on the Internet, so connection problems can be annoying. Both work and entertainment may stop. Errors such as the “default gateway not available” in Windows 10, are detected when diagnosing network problems. And since the default gateway is a critical network node for connecting to the Internet, users have no choice but to repair it as soon as possible.
The above list of solutions can be used to solve the problem quickly. Some solutions may require some technical expertise, but you can always follow the instructions and follow the procedure in a practical way.
We hope this tutorial has helped correct the error “default gateway not available” in Windows 10. Now you should be able to connect to the Internet without this problem.
APPROVED: To fix Windows errors, click here.
Frequently Asked Questions:
How to fix the inaccessible default gateway in Windows 10
- Install a new Ethernet driver.
- Change the channel of your wireless router.
- Change Power Management settings for your network adapter.
- Change the power saving mode of your wireless adapter.
- Change the frequency of your wireless router.
- Change the wireless mode to 802.11g.
- Use netshell reset command.
- Uninstall McAfee.
How do I fix the permanent unavailability of the default gateway?
One of the reasons for showing that “default gateway is not available” is the McAfee security program installed in the PC. Hence, to remove this problem go to the control panel of your PC, then enter programs and then go to program and features option.
From this option go to add or remove program option and select McAfee and then completely uninstall it.
After you uninstall this program, your issue will be resolved. To make your system virus free, you can install some other security product.
How do I restore the default gateway?
Release your current IP by typing the following ipconfig /release and then press enter. This will release any assigned IP addresses and gateways from your computer.
Next you need to type in ipconfig /renew to get a new IP address or default gateway. On the screen your should see your new Default Gateway and IP Address. If you are using a router or your IP has not changed on your modem then the addresses may not have changed.
What happens if there is no default gateway?
Your default gateway is on the same subnet as your computer, and is the gateway your computer relies on when it doesn't know how to route traffic.
If you don’t have a gateway your network communication have no problem. But you cannot communicate with other networks. That means your packet will not reach other networks.

