Updated July 2025: Stop these error messages and fix common problems with this tool. Get it now at this link

The Windows Search service indexes files for the Windows search tool. This service is the SearchIndexer.exe or Windows Search Indexer process, which is located in the “Processes” tab of the Task Manager.
However, some users have found that Search Indexer can consume a lot of system resources with high CPU and RAM usage.
Table of Contents:
Why does SearchIndexer.Exe have a high CPU load?

There may be several reasons for this problem. For example, some users have reported that the problem occurs immediately after restoring the index, which indicates data corruption.
In other cases, Windows updates may cause the Windows search database to overflow with data and become corrupted, causing the Searchindexer.exe process to try to re-index everything, which can be very resource-intensive.
How to solve the problem of the high CPU load of SearchIndexer.exe?
This tool is highly recommended to help you fix your error. Plus, this tool offers protection against file loss, malware, and hardware failures, and optimizes your device for maximum performance. If you already have a problem with your computer, this software can help you fix it and prevent other problems from recurring:
Updated: July 2025

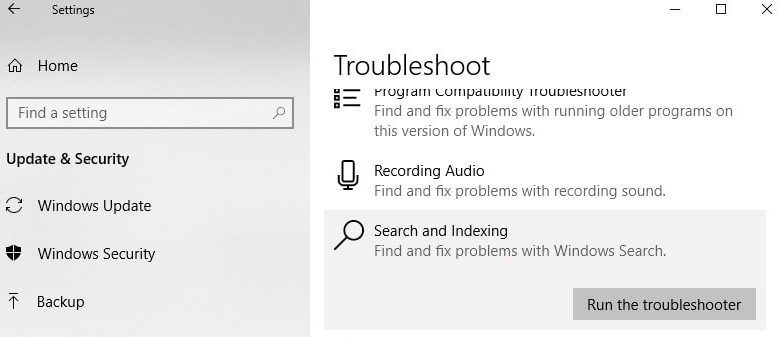
Launch the Troubleshooter for search and indexing program
- Type ‘troubleshoot’ in the Start menu search and press Enter.
- Then scroll down, select Search and Index, and run Troubleshooter.
Restore the Windows search indexer
- Open the Windows indexing options,
- Click “Change” and disable all selected locations except the OS C: drive.
- Then click OK to return to the indexing options window.
Restart the Windows search service
- Press the Windows + R key combination, type services.MSC, and press OK to open the Windows services console.
- Scroll down and double-click the Windows search service to view its properties.
- Check to see if the service is running or not. If it is not running, simply start the service and change the startup type to automatic.
APPROVED: To fix Windows errors, click here.
Frequently Asked Questions
What is SearchIndexer exe?
SearchIndexer.exe is a Windows service that indexes your Windows search files, which provides a built-in Windows file search engine that powers everything from the Start menu search bar to Windows Explorer and even the library function.
How can I fix high CPU load in Windows?
- Use third-party repair software.
- Restart the Windows search service.
- Reduce the amount of indexed data.
- Restore the index.
- Disable the search indexer.
How to get rid of SearchIndexer exe?
Run Services.MSC, double-click Windows Search Service, change the startup type to Disabled, and click Stop to stop the service.