- Download and install the software.
- It will scan your computer for problems.
- The tool will then fix the issues that were found.
Error codes are used to communicate problems with Windows operating systems. They are usually accompanied by a description of what went wrong. However, some errors do not provide enough information about why something happened. In such cases, you might see a generic error code like “0x80070026.” These error codes are often associated with a specific program or device driver. If you encounter one of these error codes, it is important to know how to troubleshoot it.
There are many possible causes of error code 0x80070026. Here we will discuss some of them.
- A failure to connect to the MS server during installation can cause this error code. If you receive this error while installing updates, try downloading the latest version again.
- Your antivirus program might have blocked the update file. To check whether it did, open up your antivirus program and find out what files it has flagged as suspicious. You can unblock the file manually by clicking Unblock button.
- You might have installed incompatible components. Make sure that your system meets the requirements for the product being updated. For example, if you are updating Office 2016, make sure that you have Office 2013 SP1 or later installed.
- Some malware could be blocking the update process. Check your computer for viruses or spyware.
- You might have disabled automatic downloads.
Table of Contents:
Try running the Windows Update Troubleshooter
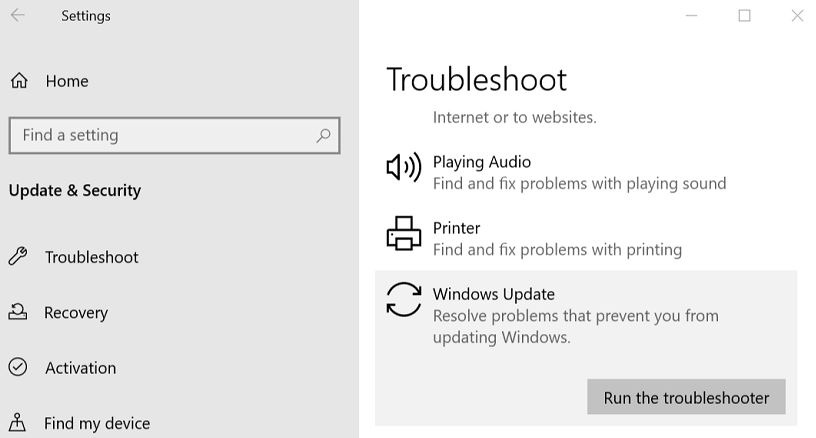
Before you start applying more sophisticated solutions, try running the built-in Windows Update troubleshooter. This tool can be useful whenever you’re unsure about what caused an error while installing a software update.
1. Just open the Start menu and press the Windows key + I keyboard shortcut to open the Settings app.
2. Type “Troubleshoot”, without quotes, into the Search bar and hit Enter. You’ll see the option “Fix issues with Windows Update”.
3. Click the button to begin troubleshooting the problem. If you don’t know what’s causing the issue, you can use the “Search online” feature to look up potential causes.
4. Once you’ve identified the source of the problem, follow the instructions to resolve it.
Utilize the SFC scan and DISM tool
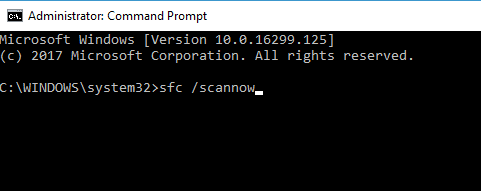
Another solution to the Windows Update Error Code 0x80070026 problem is to fix corruption in the system files. This method involves running the SFC utility and the DISM tool. These utilities are part of the Windows operating system. They scan for damaged files and attempt to repair them.
To run these tools, you must open a command prompt window as an Administrator. You can do this by pressing the Win + R key combination and typing cmd into the “Run” text box. Then, press the Ctrl + Shift keys together and enter.
The SFC utility scans for corruptions in the system files and attempts to repair them with a cached copy of the file. If it finds one, it displays a dialog box informing you about the issue. Click OK to continue.
If the SFC utility does not find any problems, it displays a message saying that everything is fine. In this case, skip to Step 3. Otherwise, select Repair All Files from the list displayed, and click Next.
Note: If you receive a warning message indicating that some files cannot be repaired, ignore it.
Updated: June 2024
This tool is highly recommended to help you fix your error. Plus, this tool offers protection against file loss, malware, and hardware failures, and optimizes your device for maximum performance. If you already have a problem with your computer, this software can help you fix it and prevent other problems from recurring:
- Step 1 : Install the PC Repair and Optimizer Tool. (Windows 10, 8, 7, XP, Vista).
- Step 2 : Click Start Scan to determine what problems you are experiencing with your computer.
- Step 3 : Click Repair Allto resolve all problems.

You should check your antivirus program
Quite frequently, your antivirus software prevents you from installing updates. This happens because some antiviruses block certain files because they suspect they’re malware. In most cases, however, this isn’t true and there are several ways to fix this issue. To test if your antivirus is blocking the update process, try to install the update while temporarily disabling the antivirus. Then, open the Update Manager again and see whether the installation worked.
If this didn’t work, you’ll probably need to uninstall the antivirus entirely. However, don’t do this immediately since it might cause problems with Windows. Instead, wait until you’ve finished downloading the update and go into Safe Mode. Once you’re in Safe Mode, simply re-enable your antivirus and restart your PC. Now that you’ve disabled your antivirus, proceed with the update process. You can use either the built-in method or third-party tools.
Manually install updates
Microsoft recommends you install updates automatically, but there are times when you must do things manually. Here are some reasons why you might want to skip automatic updates.
1. You’re running older hardware. If you’re running Windows 10 Home, Pro, or Enterprise edition on a computer that’s less than three years old, you don’t need to worry about updating. Your device will receive security fixes and improvements without any action on your part.
2. You’ve got a slow Internet connection. Automatic updates take longer to download than manual ones because they require your PC to connect to Microsoft servers and wait for those servers to respond. On slower connections, the process takes even longer.
3. You don’t trust Microsoft. Some people choose to turn off automatic updates entirely because they believe the software giant is tracking what they do online and selling that information to advertisers. In fact, according to Microsoft, it does no such thing. But if you’d like to keep your privacy intact, you’ll need to make sure you’re downloading updates manually.
4. You’re concerned about data loss. There have been cases where automatic updates caused systems to crash, resulting in lost files. This isn’t always the case, but it happens enough that many people prefer to do things manually.
5. You’re worried about viruses. Even though Microsoft says it doesn’t track your activity, it still needs to test every update thoroughly before releasing it. And sometimes, bugs slip through. So while it’s unlikely that a virus will infect your PC, you could end up with one if you skip the auto-update step.
Temporarily disable your antivirus software or firewall
Sometimes it happens that one of your third-party security tools interferes with the system restore process and causes issues like System Restore fails. This can occur due to conflicts with another program that runs in the background while performing system restores.
To resolve this problem, you can temporarily disable the antivirus or the firewall that you are running. You can do this by following the steps mentioned below:
1. Open Control Panel
2. Select Programs & Features
3. Click on Turn Windows features on or off
4. Find the feature that you want to turn off and select Disable
5. Click OK
Start your computer with a clean boot
A clean boot is useful if there are issues with Windows 10. If you’re having trouble getting things working again, it might help to do a clean boot. This process removes everything that happened since you installed Windows 10. You’ll lose some data, but you won’t lose anything important.
To perform a clean boot, go to the Start Menu and type MSConfig into the search bar. From the list of results, select System Configuration. On the Startup tab, tick the Hide all Microsoft services box. Then, choose Disable all. Navigate to the Services tab. Lastly, tick the Open Task manager button.
APPROVED: To fix Windows errors, click here.
