- Download and install the software.
- It will scan your computer for problems.
- The tool will then fix the issues that were found.
Error code 0xc00000f may appear on your system with a blue or black screen. It usually occurs after upgrading the Windows operating system or installing new device drivers, programs, etc. The error may be indicated by various messages on the screen, including :
- Your computer needs repair – error 0xc00000f.
- Failed to start Windows 0xc00000f without installation media.
- Error code 0xc00000f: The required device is not connected or not available.
Because of this error, you might have problems booting the system normally and losing access to its data. But don’t worry! You can easily fix this system error using the methods described in this blog. But before that, let’s find out the most common causes of this error.
Table of Contents:
What are the most common causes of error 0xc00000f

- The data cable is faulty: If you’ve been using the same data cable for years, it can become damaged over time. Then a faulty cable can cause read and write errors that affect the operating system boot process.
- System file corruption: If your computer suddenly shuts down due to a power failure while updating Windows or writing important information to the boot sector, the system file may be corrupted and cause this boot BCD 0xc00000f problem.
- Missing or corrupt boot configuration data: The first and most important cause is missing or corrupt BCD, which can also be understood from the error code screen statement. Boot sector virus, power failure, hard disk write errors and BCD manual configuration errors can cause missing or corrupt BCD.
How to get rid of error 0xc00000f
Perform Startup Repair
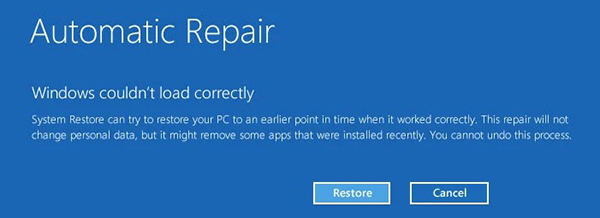
If your Windows 10 computer isn’t starting properly, you can use Startup Repair to diagnose and fix problems. This tool will automatically scan your system for common problems and attempt to fix them. Here’s how to use Startup Repair on Windows 10:
- Boot from your Windows 10 installation media. To do this, you’ll need to access the Advanced Startup Options menu. On most computers, you can do this by pressing the F8 key during startup. If that doesn’t work, you can also try holding down the Shift key while clicking the “Restart” option in the Start menu.
- In the Advanced Startup Options menu, select “Troubleshoot.”
- Click on “Startup Repair.”
- Wait for Startup Repair to scan your system and attempt to fix any problems it finds.
- If Startup Repair is successful, you’ll see a message telling you so. You can then restart your computer and try booting normally. If Startup Repair is unsuccessful, you’ll see a message telling you so. You can then try other troubleshooting options if you wish, or you can simply restart your computer and hope that the problem has fixed itself.
Updated: July 2025
This tool is highly recommended to help you fix your error. Plus, this tool offers protection against file loss, malware, and hardware failures, and optimizes your device for maximum performance. If you already have a problem with your computer, this software can help you fix it and prevent other problems from recurring:
- Step 1 : Install the PC Repair and Optimizer Tool. (Windows 10, 8, 7, XP, Vista).
- Step 2 : Click Start Scan to determine what problems you are experiencing with your computer.
- Step 3 : Click Repair Allto resolve all problems.

Run CHKDSK Command
While Windows 10 File Explorer has gotten a lot more user-friendly over the years, there are still some things that can be done to make it even better. One such thing is to run CHKDSK, which is a utility that can help to fix errors on your hard drive and improve its performance. Here’s how to do it:
- First, open the File Explorer and go to This PC.
- Right-click on the drive that you want to scan and select Properties.
- In the Properties window, go to the Tools tab and click on Check.
- You will see a message asking if you want to scan the drive for errors; click Yes.
- CHKDSK will now begin scanning your drive; this process can take a while, so be patient.
- Once it’s finished, you will see a report of any errors that were found and repaired.
Run SFC
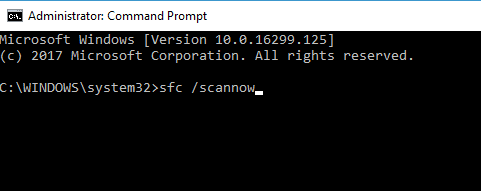
To run an SFC scan on Windows 10, follow these steps:
- Open the Start menu and type ‘cmd’.
- Right-click on the ‘Command Prompt’ option and select ‘Run as administrator’.
- Type ‘sfc /scannow’ into the Command Prompt window and press Enter.
- The scanning process will take some time to complete. Once it is finished, you will see a message indicating whether or not any corrupt files were found.
- If corrupt files were found, they will be repaired automatically. Reboot your computer and rerun the scan to confirm that the issue has been resolved.
Launch system restore
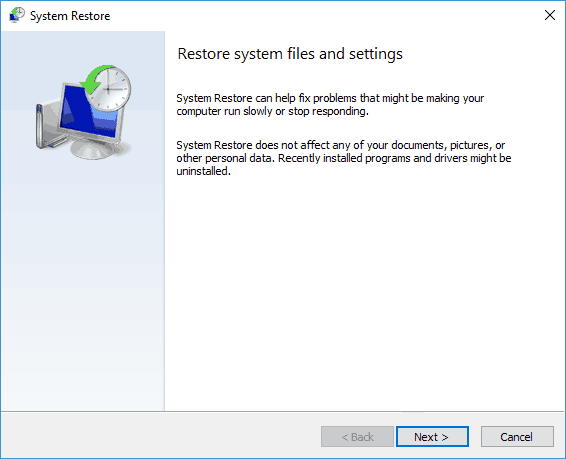
Are you having problems with your computer and want to restore it to an earlier date? Here’s how to do it on Windows 10:
- First, open the Control Panel. You can do this by searching for it in the Start menu.
- Next, click on the option for System and Security.
- Under the heading of Backup and Restore, click on the link that says “Restore system files and settings.”
- On the next page, click on the button that says “Advanced Restore.”
- You will then be given the option to select a restore point. Choose the date that you want to restore your computer to and then click “Next.”
- Follow the prompts to complete the restoration process. Restart your system when prompted.
By following these simple steps, you can restore your computer to an earlier date.
APPROVED: To fix Windows errors, click here.
Frequently Asked Questions
What causes error 0xc00000f?
- System file corruption.
- The data cable is faulty.
- Missing or corrupt boot configuration data.
How do I eliminate the error 0xc00000f?
- Run SFC.
- Launch system restore.
- Perform Startup Repair.
- Run CHKDSK Command.
How to perform a system restore?
- Open the Control Panel. You can do this by searching for it in the Start menu.
- Next, click on the option for System and Security.
- Under the 'Backup and Restore', click on the link that says "Restore system files and settings."
- Next, click on the button that says "Advanced Restore."
- You will then be given the option to select a restore point.
- Choose the date that you want to restore your computer to and then click "Next."
- Follow the prompts to complete your restoration process.
- Restart your system when prompted.