
- Download and install the software.
- It will scan your computer for problems.
- The tool will then fix the issues that were found.
In this topic, we will talk about DISM Failed which is a common error in Windows 10. Deployment Image Service and Management or DISM is an integrated tool that allows network administrators to prepare, modify, and restore system images, including the Windows Recovery Environment, Windows Configuration, and Windows PE (WinPE). However, you can also use this tool to solve common problems related to the hidden image recovery of your computer.
If your device does not start up properly, has performance problems, or if you need to fix a specific error, you can usually use the System File Checker tool to scan and replace missing or damaged system files using a hidden recovery image in your installation.
The only caveat is that the SFC tool will not work if one or more files in the Windows 10 image are corrupted. If you are in this scenario, you can use DISM to restore the “install.wim” image and then use SFC to restore the installation without having to reinstall the operating system from scratch.
Table of Contents:
What Does DISM Do
The Deployment Image Servicing and Management Control Tool provides three options for Windows 10 image recovery, including Check Health, Scan Health, and Restore Health, which you want to run in this order. Depending on the severity of the problem, you can also use special settings with the Restore Health option to restore a locally available image using different source files.
In this DISM Failed Windows 10 fix, we will look at the steps to use DISM and SFC tools using a command prompt to restore your device.
Important: Although these are non-destructive commands, you will make changes to the system. It is recommended that you make a temporary full backup before you get started.
The most common error messages for DISM Failed and why it happens:

-
-
- DISM failed no operation was performed
- DISM failure when attempting to copy boot files
- Error Code 87, 112, 11, 50, 2, 3,1726, 1393, 1910, etc.
- Dism.exe failed validating command line, to load wim manager
- DISM failed while processing command cleanup-image, add-package
- DISM failed 0x8000ffff, 0x800f0954, 0x800f081f: The Source File Couldn’t be Found
- DISM failed to load the provider, to unload offline registry, to flush file buffers, to set the windows directory, mount the image
-
We execute a DISM command to recover damaged system files. This is therefore a very important command for diagnosing problems with Windows PC error. If a DISM failure occurs, several error messages may appear. However, the solutions are very common.
How to Fix DISM Failed
Updated: July 2025
This tool is highly recommended to help you fix your error. Plus, this tool offers protection against file loss, malware, and hardware failures, and optimizes your device for maximum performance. If you already have a problem with your computer, this software can help you fix it and prevent other problems from recurring:
- Step 1 : Install the PC Repair and Optimizer Tool. (Windows 10, 8, 7, XP, Vista).
- Step 2 : Click Start Scan to determine what problems you are experiencing with your computer.
- Step 3 : Click Repair Allto resolve all problems.

Solution 1: Check your Antivirus or Security Software
Antivirus software installed on your computer can cause many problems (e.g. compatibility problems and file loss). Unfortunately, it will also cause a DISM Failed error. Antivirus software in the security program is able to interfere with your system and any critical process.
Therefore if possible, I advise you to disable all antivirus/protection programs or remove them temporarily and then repeat the DISM scan to see if it works.
- If this has helped solve the problem of DISM not working, you should consider modifying the antivirus software or disabling the security features.
- If this method did not help, it means that the DISM error has nothing to do with the antivirus software and you should continue to see other methods.
Solution 2: Execute DISM Command in “Clean Boot” Mode
This method works when a DISM fails due to a service conflict.
- Open the Settings application by clicking on windows and selecting settings (you can also open it by pressing Win + I directly).
- Scroll down and select update & security.
- Switch to the recovery option on the left pane.
- In the right pane, look for the “advanced startup” section. Then click the “restart now” button below it.
- Select troubleshoot in the Select Options window.
- Select advanced options, then click the command prompt.
- Select your account to continue.
- Run a DISM command (for example, DISM /Online /Cleanup-Image /Check Health) and you will see it.

Solution 3: Specify/Change the Correct Location for the Install.wim File
When you get the source files could not be found error, you need to check the location of the install.wim file. Under these conditions, you will need the help of a boot floppy (or at least a system ISO file).
Important: the DISM command is case sensitive; before executing the command, you should make sure that each word is spelled correctly.
How to specify the correct location for the install.wim file:
- Keep a boot disk at hand (if it is an ISO file, you should create a boot disk with it).
- Open the Windows search window and type cmd.
- Right-click on the command prompt and select run as administrator, remembering the letter of the boot disk.
- Enter this command in the command line window: DISM /Online /Cleanup-Image /RestoreHealth /source:WIM:F:\Sources\Install.wim:1 /LimitAccess (* is the boot media drive letter). Then press the “Enter” key on your keyboard.
- Wait for the command to finish.

How to copy install.wim (from the boot drive to the local C: drive):
- Insert the boot disk in your computer or mount the ISO file and create it.
- Find the install.wim file and copy it with ctrl + c.
- Go to your local C: drive (if your system is installed on another drive, please go there). Then paste the file by pressing ctrl + v.
- Run a command prompt as administrator and type DISM /Online /Cleanup-Image /RestoreHealth /source:WIM:C:\Install.wim:1 /LimitAccess (C is your system location).
- Then press the “Enter” key and wait for the command to be finished.
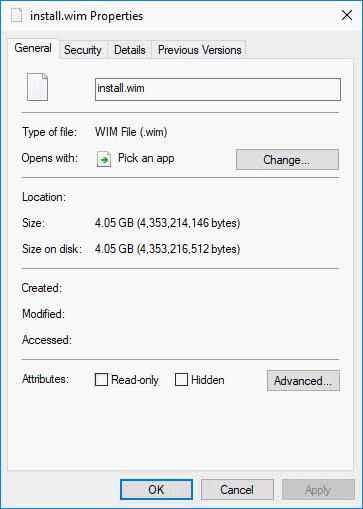
Solution 4: Disable Read-Only Option in Install.wim
- Open the file explorer to find the wim file.
- Right-click and select properties.
- See the section attributes below.
- Disable the read-only option.
- Click apply and confirm by clicking ok at the bottom.
- Now, run the DISM command, specifying the source again.
Solution 5: Cleaning System Image Components
- Run command prompt as administrator.
- Type or copy and paste the command into the administrator: command prompt window – exe /online /Cleanup-Image /StartComponentCleanup.
- Press the “Enter” key on your keyboard and wait for the command to finish.
- Reboot your computer and try the DISM scan again.

If this command fails, you can try your luck with the following commands:
- DISM /Online /Cleanup-Image /StartComponentCleanup
- DISM /Online /Cleanup-Image /AnalyzeComponentStore
- exe /online /Cleanup-Image /StartComponentCleanup
- exe /online /Cleanup-Image /StartComponentCleanup /ResetBase
Solution 6: Reset Windows Update Service
- Run command prompt as an administrator.
- Type net stop wuauserv and press enter.
- Wait for the command to finish.
- Repeat steps 2 and 3 to execute these commands in the following order: cd %systemroot%SoftwareDistribution, ren Download Download.old, net start wuauserv, net stop bits, net start bits, net stop cryptsvc, cd %systemroot%system32, ren catroot2 catroot2old, and net start cryptsvc.
- Reboot your computer and try to use DISM.
Solution 7: Run the Troubleshooter
- Press Win + I on the keyboard to open the settings.
- Select Update & Security (Windows Update, Restore, Backup).
- On the left pane select the troubleshoot option.
- Find Windows Update and select it in the right pane.
- Click on the button “Run the troubleshooter” that just appeared.
- Follow the on-screen instructions to complete the rest of the process.

Conclusion
Since finding different solutions everywhere can take some time, we have given you simple and easy steps to fix this error yourself. Just review the above solutions and one of them will definitely help you solve the problem with the DISM Failed error.
If not, it is also recommended to disable your proxy. Many users use a proxy to protect their Internet privacy, but sometimes your proxy can interfere with your system and cause these and other errors.
If the DISM scan failed to complete or execute on your computer, the problem could have been caused by your proxy.
APPROVED: To fix Windows errors, click here.
Frequently Asked Questions:
What happens if DISM fails?
If DISM has failed on your system, you can solve the problem by disabling some antivirus features or by disabling your antivirus program completely. If this does not help, you can try uninstalling your antivirus program. If you have uninstalled your antivirus program, check DISM again.
How do I fix a DISM error?
- Temporarily disable/remove antivirus. Third-party antivirus programs that you use on your PC are often responsible for various problems.
- Fix DISM errors by specifying/optimizing Install.wim.
- Update the DISM tool and clean the system image components.
- Troubleshoot your Windows update.
- Check your Internet connection.
How to restore DISM 0x800f081f in Windows 10?
The solution to DISM error 0x800f081f is to download a new ISO from the Microsoft website, copy the Windows 10 installation disc and specify it as the recovery source when you run the DISM command. Slipstreaming is the process of integrating updates (and additional drivers) and creating an updated Windows 10 Configuration Disc or ISO.
How do I fix a DISM 2 error?
- Temporarily disable or uninstall your antivirus program.
- Check your version of DISM.
- Update the DISM tool.
- Reset your computer using the "Save My Files" option.
- Use the disk cleanup tool.