- Download and install the software.
- It will scan your computer for problems.
- The tool will then fix the issues that were found.

Some Windows users have encountered a new Event Viewer ID (Service Manager - error 7001) after an unexpected system crash. This problem has been confirmed to occur in Windows 7, Windows 8.1 and Windows 10.
Table of Contents:
Cause:
The registry section for the secure storage service is missing in the registry.
Before proceeding with the workaround, make sure that the registry section for the protected storage service is missing. The ProtectedStorage service registry key is located at the following path:
HKEY_LOCAL_MACHINE \ SYSTEM \ CurrentControlSet \ Services
Use the command line
To solve this problem, register the Protected Storage service in the Windows NT registry by following these steps:
- Enter the following command at the command line:
% SystemRoot% \ System32 \ Pstores.exe - install - Close all programs and restart your computer.
The same command can be used to remove protected storage keys. If you run this command and a registry section exists, it can be deleted along with all other protected storage keys.
Enable NetBIOS via TCP / IP
This problem may arise because NetBIOS is disabled via Transmission Control Protocol / Internet Protocol (TCP / IP).
To solve this problem, you must enable NetBIOS over TCP / IP by following these steps:
Updated: November 2024
This tool is highly recommended to help you fix your error. Plus, this tool offers protection against file loss, malware, and hardware failures, and optimizes your device for maximum performance. If you already have a problem with your computer, this software can help you fix it and prevent other problems from recurring:
- Step 1 : Install the PC Repair and Optimizer Tool. (Windows 10, 8, 7, XP, Vista).
- Step 2 : Click Start Scan to determine what problems you are experiencing with your computer.
- Step 3 : Click Repair Allto resolve all problems.
1) Open the Device Manager.
2) On the View menu, check the “Show hidden devices” box.
3) Double-click Drivers that do not support Plug-and-Play.
4) Double-click NetBIOS via Tcpip.
5) In the “Use Device” field, click “Use this device (activate)”.
If you restart the system, it may take longer for the server to restart. If you are experiencing this problem, go to the following registry section:
HKey_Local_Machine / System / CurrentControlSet / Services / Netlogon / DependOnService
Double-click DependOnService and add the following value in the multi-line editor (if it does not already exist)
LanmanServer
Correct network discovery dependencies
In fact, this problem can also occur if there is an issue with some of the dependencies used by the Network Discovery component. Several affected users facing the same Service Control Manager - 7001 error confirmed that they solved the problem by running certain commands at the CMD command line with elevated privileges before clearing the PeerNetworking folder in the AppData folder.
This operation seems to have helped many affected users stop creating a new event ID with this error. Here’s what you need to do:
- Press Windows Key + R to open the Run dialog box. Then type “cmd” in the text box and press Ctrl + Shift + Enter to open a command prompt with elevated privileges. When prompted for user account control, click Yes to grant administrator access.
- At the elevated command line, type the following commands and press Enter after each command to add and enable the local service required for the network discovery feature
- net service / add local group administrators
- service / add local group net administrators
- After successfully processing both commands, open Explorer (My Computer) and go to the following location:
- C: \ Windows \ ServiceProfiles \ LocalService \ AppData \ Roaming \ PeerNetworking
- Note. If the AppData folder is not showing, use the ribbon at the top to go to the “View” tab and check the “Hidden Items” box.
- Once in the PeerNetworking folder, press Ctrl + A to highlight everything. Then right-click the selected item and choose “Delete” from the context menu that appears.
- Once you have successfully deleted the contents of the PeerNetworking folder, restart your computer and see if the problem is resolved the next time you start up.
Perform a system restore
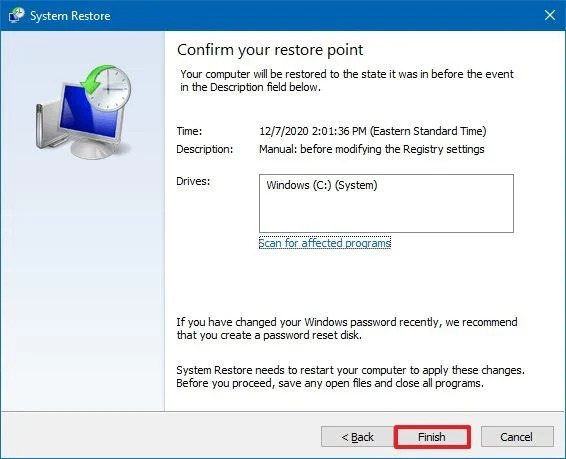
If the problem has occurred recently, try restoring the system and check.
- Open Start.
- Find “Create Restore Point” and click on the highest result to open the System Properties page.
- Click the System Restore button.
- Click the Next button.
- Select a restore point to undo the changes.
- Click the Scan for vulnerable programs button to confirm which applications will be removed when added after the restore point is created.
- Click the Close button.
- Click the Next button.
- Click the Finish button.
After you have completed all the steps, the system restore will return your device to its previous state.
APPROVED: To fix Windows errors, click here.
