- Download and install the software.
- It will scan your computer for problems.
- The tool will then fix the issues that were found.
Many Windows users prefer to use the standalone Windows Update installer to update their systems. Although it is not entirely standalone, it offers a reliable way to update your system to the latest version. However, users have reported a problem with the windows update standalone installer.
This means that you are unlikely to be able to update your device through the standalone Windows Update installer, as it spends hours searching for updates or gets wholly stuck at this stage. It’s easy to see why this situation needs to be resolved as soon as possible.
In this article, you will find several options to restore the windows update standalone installer error on Windows PC.
Table of Contents:
What causes an error on the windows updates standalone installer?
Many different reasons cause Windows stand-alone installer error codes. Some common ones include:
1: A corrupt system file entry.
2: Bad RAM allocation causes a high load on the CPU. This could happen because of hardware failure or improper installation.
3: An incompatible update is being installed.
4: Not enough disk space.
5: You’re trying to install an older version of Windows.
6: Your computer doesn’t meet the requirements for installing Windows Updates.
How to troubleshoot windows update standalone installer error?
Launch the SFC scanner & DISM tool
Windows System Files Corruption could be one of the reasons that the Windows Update Standalone installer is stuck in the search. You can try running the following command-line utility to fix corrupted system files.
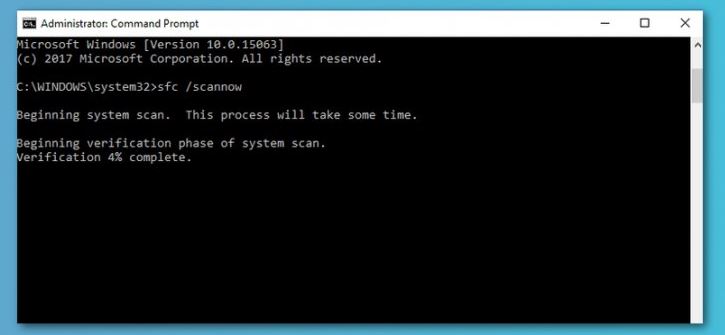
Step 1: Open Command Prompt window. To open it, type cmd into the Start Search box and press Enter. Or, right-click the Command prompt icon on the desktop and select Run As Administrator.
Step 2: Type sfc /scannow and press Enter. If there are no issues found, type exit and press Enter.
Step 3: Type dism /online /cleanup-image /restorehealth and press Enter. Wait for the process to finish. When done, type exit and press enter again.
Step 4: Reboot your computer.
Step 5: Use Windows Update again to check for updates.
Step 6: If you still see a problem, run SFC once again and follow steps 2 and 3 above.
Updated: June 2024
This tool is highly recommended to help you fix your error. Plus, this tool offers protection against file loss, malware, and hardware failures, and optimizes your device for maximum performance. If you already have a problem with your computer, this software can help you fix it and prevent other problems from recurring:
- Step 1 : Install the PC Repair and Optimizer Tool. (Windows 10, 8, 7, XP, Vista).
- Step 2 : Click Start Scan to determine what problems you are experiencing with your computer.
- Step 3 : Click Repair Allto resolve all problems.

Utilize the Windows Update troubleshooter
Microsoft’s Windows Update Troubleshooters are great tools for fixing common issues like missing drivers, slow performance, and system crashes. However, sometimes even those simple steps don’t work. If you’re still having problems, try running the Windows Update Troubleshoot tool. This tool automatically scans your PC and fixes most issues without manual intervention.
To run the Windows Update Troubleshooting Tool, do the following:
Step 1: Open the Start menu and type “settings.” You’ll see the Settings app.
Step 2: In the left pane, navigate to the System category. Click on the Advanced tab.
Step 3: Scroll down until you find the option called “Troubleshoot.” Select it.
Step 4: A window will pop up asking you to confirm whether you want to perform the scan. Click Yes.
Step 5: Wait while the tool runs. When done, click OK.
Turn off automatic updates
The Windows Update Service runs automatically every 30 days and installs recommended updates, security updates, and optional updates. If you are running a computer without Internet access, it will download the updates and install them later. You can disable automatic updates by following these steps:
Step 1: Locate the Windows Update service and double-click it.
Step 2: In the Properties window, select Stop.
Step 3: Close the properties window.
Step 4: Restart the computer.
You can find out what updates are installed by opening the Event Viewer. To do this, follow these steps:
Step 1: Right-click the taskbar and select Task Manager.
Step 2: In the Processes list, locate the Windows Update service. Double-click it to start it.
The log file should contain information about any updates that were recently installed.
Make use of the WSUS Offline Updater to update
Alternatively, you can also use Windows Server Update Services (WSUS), a free Windows update management tool, to download missing updates from a remote server. You can use it to manage both automatic and manual updates. To do this, follow these steps.
Step 1: Download and install the latest version of WSUS Offline Updatersetup.
Step 2: Open the program and select “Offline Updates.”
Step 3: In the left pane, under “Updates,” check “Download updates from:” and enter the URL of the server which you want to download updates from. Then click OK.
Step 4: On the next screen, make sure you check the box labeled “Include C++ Runtime Library and.NET Framework” and click OK.
Step 5: Wait for the process to finish. When finished, you’ll see the list of installed updates. Click Finish.
Step 6: If there are updates for your computer, you’ll now receive notifications about those updates.
Make sure your device is virus-free and malware-free
If you are still experiencing problems while trying to install Windows 10 Fall Creators Update, we recommend scanning your device for viruses or malware. This way, you can make sure that your PC is clean and safe. You can perform a full scan on your device in just a few minutes.
The following steps show how to do it:
Step 1: Start Microsoft Security Essentials or another reputable anti-virus software program, and open the Settings menu.
Step 2: In the left pane, select System.
Step 3: Click on the Startup tab.
Step 4: Select Troubleshoot startup issues.
Step 5: On the next screen, select Advanced options.
Step 6: Under Startup Options, choose Run diagnostics.
Step 7: After the scan completes, click Save changes.
Step 8: Reboot your system.
APPROVED: To fix Windows errors, click here.
Frequently Asked Questions
How to repair windows update standalone installer error?
- Disable automatic updates.
- Update via WSUS Offline Updater.
- Run the Windows Update troubleshooter.
- Download the latest version of Service Stack Update (SSU).
- Download the latest version of KB.
- Repair Windows file corruption.
How to install a windows standalone updater?
To begin installing a Windows Service Pack, simply double-click on the downloaded MSU file. If the update applies to this computer, the Windows Update standalone installer window will open and ask you to confirm the update installation.
How to install the standalone installer for Windows?
- Click the Start button.
- In Event Viewer, expand Windows Log, and then click Install.
- In the Actions pane, click Filter the current log.
- In the Event Sources list, select the WUSA check box, and click OK.
