Updated July 2025: Stop these error messages and fix common problems with this tool. Get it now at this link

Windows Media Player (WMP) has a media sharing feature that allows you to transfer your computer’s media library to other devices over a network. Wmpnetwk.exe is the process that runs the media sharing service in the background.
When you first enable media sharing in WMP, wmpnetwk.exe immediately begins indexing your media library. CPU utilization may increase during this process or when you transfer media files to other devices.
Table of Contents:
Why does wmpnetwk.exe have a high CPU and hard disk load?

The problem of high memory usage is actually the result of too many processes running simultaneously. Another problem is driver incompatibility. Some hardware manufacturers have not updated their drivers for Windows, which leads to performance problems. Incompatible drivers can lead to memory leaks, making CPU and memory usage very high.
How to eliminate high CPU and hard disk load with Wmpnetwk.exe?
This tool is highly recommended to help you fix your error. Plus, this tool offers protection against file loss, malware, and hardware failures, and optimizes your device for maximum performance. If you already have a problem with your computer, this software can help you fix it and prevent other problems from recurring:
Updated: July 2025

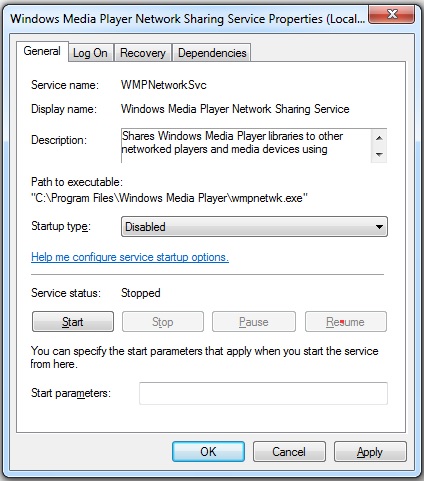
Permanently turn off the Wmpnetwk.exe service
- Open Services, right-click Window Media Player Network Sharing Service, and select Stop.
- Open its properties. On the General tab, select Disabled for the Startup Type option. Then click the Apply button.
To prevent Wmpnetwk.exe from running automatically
- Press Win + R to open the Run window. Then type services.MSC in the box and press Enter to open Services.
- Scroll down to find the Window Media Player network sharing service. Then right-click on it and stop it.
- Wait for the service to stop. Then right-click it again and select Properties.
- In the General tab’s pop-up window, select Manual for the startup type. Click Apply to save your changes.
- Save your work and restart your computer. Then open Windows Services again and go to the Window Media Player Network Sharing Service properties.
- On the General tab, select Automatic for startup type and click Apply.
Uninstalling Windows Media Player
- Click the Start button to open the search tool.
- Enter control in the search box and select Control Panel in the search results.
- Select ‘Browse by Category’ in the upper right corner and click Uninstall Program.
- In the window that appears, click Enable or Disable Windows Features.
- Double-click Media Features to expand the category.
- Then uncheck Windows Media Player to remove it.
- In the pop-up window, click Yes to confirm the operation.
- Then click OK.
APPROVED: To fix Windows errors, click here.
Frequently Asked Questions
What is Wmpnetwk Exe?
The wmpnetwk.exe process is a non-threatening service created by Microsoft to enable media sharing in Windows Media Player or Media Center. If you are not using Windows Media Sharing, you should disable this service, as it runs 24 hours a day and consumes a significant amount of system resources.
Why does Windows Media Player use so much CPU?
Windows Media Player's high CPU load may be due to too much information being stored in the library.
How do I turn off Wmpnetwk Exe?
Use the Win +R command to display the Run dialog box, type Services. MSC and press Enter. 2. Scroll down to Windows Media Player Network Sharing Service, right-click it and stop it.