Updated July 2024: Stop these error messages and fix common problems with this tool. Get it now at this link
This guide provides instructions on how to troubleshoot Windows installation error 0x80070570: “Windows cannot install the necessary files. The file may be damaged or missing. Make sure you have all the files you need for the installation, and restart the installation.” The 0x80070570 Windows installation error usually occurs when you install Windows 10, 8, or 7 from a USB 3.0 installation media.
Table of Contents:
What causes the error 0x80070570
- The application cannot find the files needed to start the process, which may be due to errors in registry settings or because important registry files are corrupt or missing.
- The computer cannot process certain files or settings required by the Windows installation CDs. The installation CD may be corrupted or have the wrong permissions.
- Built-in SATA drivers are not properly recognized during the installation process, for example, if your computer’s BIOS is set to RAID Aotudetect/AHCI mode.
- Deleted files remain on the computer but the system cannot read them, or the computer user tries to delete or move some files stored in a certain folder, which is not allowed by the system.
How to resolve the error 0x80070570?
This tool is highly recommended to help you fix your error. Plus, this tool offers protection against file loss, malware, and hardware failures, and optimizes your device for maximum performance. If you already have a problem with your computer, this software can help you fix it and prevent other problems from recurring:
Updated: July 2024

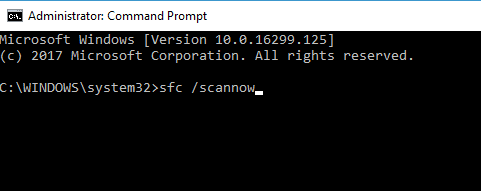
Launch the system file checker (SFC)
- Press the Windows + X key and select Command Prompt (Admin).
- Now type the following text into cmd and press Enter:
Sfc /scannow. - Wait for the above process to complete and then restart your computer.
- Allow the above process to finish and reboot the computer to save your changes.
Update BIOS
- To do this, press the Windows + R keys, type “msinfo32” (without the quotes) and press Enter to open the system information window.
- When you open the system information window, find the BIOS version/date and make a note of the manufacturer and BIOS version.
- Then go to the manufacturer’s website, for example, in my case it’s Dell, so I go to the Dell website and type in my computer’s serial number or click on the Auto Detect option.
- In the driver list that appears, I now click on BIOS and download the recommended update.
- After downloading the file, just double-click on the exe file to run it.
Change the SATA mode to AHCI
- Boot into the BIOS (for Dell, press the Delete or F2 key when displaying the Dell home screen, other computers may use a different key).
- Go to Disks -> SATA Operation. (On a non-Dell computer).
- Change the SATA configuration to AHCI.
- Press the Escape key and select Save/Exit.
- Shut down the computer and disconnect all USB devices before trying the installation again.
- If the error persists, reset the SATA operation settings to defaults and reboot.
APPROVED: To fix Windows errors, click here.
Frequently Asked Questions
How can I fix the Windows installation error code 0x80070570?
- Reboot your computer.
- Run Windows update.
- Download the Windows update again.
- Try reinstalling the application.
- Make sure the disk is not corrupted.
- Download the file again.
- Check the official channels.
- Check your hard drive for errors.
How do I fix a Windows 10 installation error?
- Make sure you have enough memory on your machine.
- Run the Windows update several times.
- Check for third-party drivers and download any updates.
- Disable all additional hardware.
- Check the Device Manager for errors.
- Uninstall third-party security programs.
- Fix the hard drive errors.
- Perform a clean Windows reboot.
How do I fix the “Windows can’t install required files” error?
- Make sure your DVD drive is clean.
- Remove the overclocking settings.
- Connect your hard drive to a different SATA port.
- Make sure you are installing the correct version of Windows.
- Disable the Run Disable Bit option in the BIOS.
